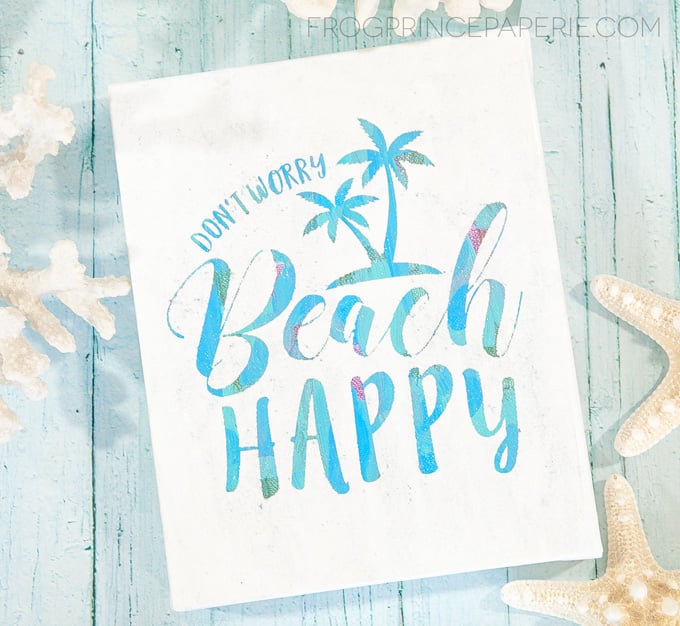
Hot mess canvas projects have been all over the place recently. Not sure what took me so long, but I finally decided to try it out for myself and share with you here what I found to be the best way to go about making a hot mess canvas. Since my new guest room has somewhat of a “Florida” theme, I’m really making a bit of DIY beach decor for my new guest room. Projects like these are perfect for filling in spots in your home decor!

As with all my DIY projects, I’ve run through the process of making a hot mess canvas and made some mistakes that I’m going to point out to you. So when you go to do your own hot mess project, you won’t have to waste time and materials trashing a project or starting all over again with new materials.
Ever wondered how to make a hot mess canvas? Here's a step by step tutorial to making this project. Creating a hot mess canvas is a perfect activity to do with kids, at a girl's night in party, or just by yourself. While the list above is recommended, feel free to make substitutions for whatever is going to work for your particular hot mess canvas, not just this bit of DIY beach decor. I really loved the Plaid paint I used in making my Beach Happy canvas; it changes color depending on the light! You really can't go wrong on this part--just cover the entire surface in paint, however it makes you happy. I chose lots of short brush strokes in different colors for my base later. This canvas has a pretty thick edge that I am painting white later on anyway, so I chose not to paint the edges of my hot mess canvas. Let the paint COMPLETELY dry before you go to the next step. Sometimes a blowdryer can help things along here, but I'd recommend at least an hour or two! If you're making this 8x10 hot mess canvas, be sure to download the "Don't Worry Beach Happy" free SVG file. Upload it to your cutting machine's program (I'm a Cricut fan!), and cut it out of vinyl. Weed out all the extra vinyl, then top with transfer tape to apply it to your canvas. If you're using a different size canvas for your project, be sure to measure how large you want your image to be on the canvas and resize the image accordingly in your design program before cutting. Getting the vinyl to stick to your canvas is going to be a little bit of a challenge. Burnish (rub on the vinyl) the image to the canvas with some force. It will eventually stick. It also helps to flip the canvas over and burnish it from the back as well. After the vinyl adhered to my canvas, I did go around and rub down the edges of the lettering to make sure there was as much seal as I could get to keep the paint from bleeding under the edges of the vinyl. For this hot mess canvas, I used white paint as my top coat. You can use whatever color you want, though! Use a stencil brush if you have one and be sure to stiple the paint on to the canvas. That is--use a small amount of paint at a time, holding the brush perpindicular to the canvas and dab onto the surface. You don't want to make long sweeping strokes with your brush onto the canvas in order to avoid getting paint bleed under the vinyl. If your coverage from the first coat is splotchy, go ahead and put on a second. Admittably, my project here probably could have used a second coat, but I had kids to take to swim practice and needed to take a few pictures. Once again, let the paint dry COMPLETELY before going on to the next step. Use a hair dryer to help the process along if you have to! It's easiest to use your Cricut weeding tool to peel the pieces of vinyl off your hot mess canvas. As you do, you'll reveal the base coat that was underneath and it gives an amazing texture to the painting. This part is optional, but I like to seal acrylic paintings when I'm done. You can use a gloss or satin varnish meant for acrylic paint and swipe on a quick layer. Plaid also makes this neat product called Dragon Glaze that has a shimmery quality to it, but it's clear. It's basically a coat of understated sparkle over the painting once you put it on, but works great as a sealant! Why do I need to buy a fine weave canvas? From experience, I'm going to recommend that you try to find as fine a weave canvas as possible for your hot mess project. If you've ever used vinyl as a stencil before, you probably know that the vinyl needs a really flat surface to stick to in order to keep the paint from bleeding under the vinyl. The looser weave canvases are great for grabbing onto paint...but not onto vinyl. You might not end up with the perfect lines that you want once the vinyl is peeled up if you use a canvas with lots of bumps in it! Do I really need stencil brushes? You get the best results when you use the right tool for the job. If you have a few stencil brushes, they're definitely the first choice. Otherwise, use a stiff bristle brush or a foam brush for painting on. As you can see in my photos, I didn't have a stencil brush, so I used what I had, but the paint would have looked nicer with the right tool. Stencil vinyl vs. Regular vinyl. I've used both for stenciling and I don't see much difference in the two other than cost. As you can see in these pictures, I used a regular vinyl. First, I was out of stencil vinyl and second, it's lots easier to show in pictures what's going on with the regular stuff! If you're good with using what you have in a pinch, it's a-ok! As an Amazon Associate and member of other affiliate programs, I earn from qualifying purchases.
How to Make a Hot Mess Canvas
Materials
Tools
Instructions

Gather up your materials for your hot mess canvas.

Paint on a wild pattern onto your canvas to create a hot mess base layer.

Cut and weed vinyl stencil for your hot mess canvas.

Paint a solid color over the hot mess base layer and vinyl.
Remove the vinyl for your final reveal of your hot mess canvas.
Finishing off the hot mess canvas
Notes
How to make a hot mess canvas Q&A
Recommended Products


Florida Guest Room Re-do
If you’re a little curious about my “Florida” guest room (and I hope you are!) be sure to check out my full length videos on Instagram TV here. I update every once in a while as I make progress. Lots of DIY projects in here! Would love to have you along for the re-do and I welcome feedback!
Related Ideas