
With all the work and expense that goes into planning a vacation, a staycation is often more relaxing! Our family is pretty fortunate to live in Central Florida where there are tons of vacation attractions we can get to with a short road trip—one of our favorite spots is the Kennedy Space Center (KSC) while we are staycationing. We even tie trips there to at-home STEM projects, like learning how to make a scribble bot.

More on the bot later!
This past Saturday, we set our sights to see some of what NASA had to offer at KSC.

On this trip, we found out the space center is holding a “Summer of Mars.” Completely fascinating, all of it! Did you know we’re going to have humans on Mars by 2030??? That’s only 13 years away!


Here’s one of the new Mars Rovers they’re building to explore the planet’s surface.

The old one looks way different!

Inside every building there are so many hands-on exhibits for the kids to experiment with. They even have a chance to pilot an orbital docking station.
My kids always always have to go see the space shuttle Atlantis while we are there. I don’t mind, as I get goosebumps every time I step into that building. Human ingenuity is awe-inspiring, especially when you see everything that goes into putting a live person into space and bringing them home safely.

Of course, by the time we get to this area of KSC, the kids are usually begging for drinks. I kept a few Tum-E Yummies in my camera bag this time for them. So great for road tripping!

We saved our Tum-E Yummies bottles from this trip (they’re the perfect size), and made a great STEM project that kept them busy for HOURS after. There is a little engineering work that goes into creating a scribblebot and you learn a bit about circuitry as well, even if you try hard not to!
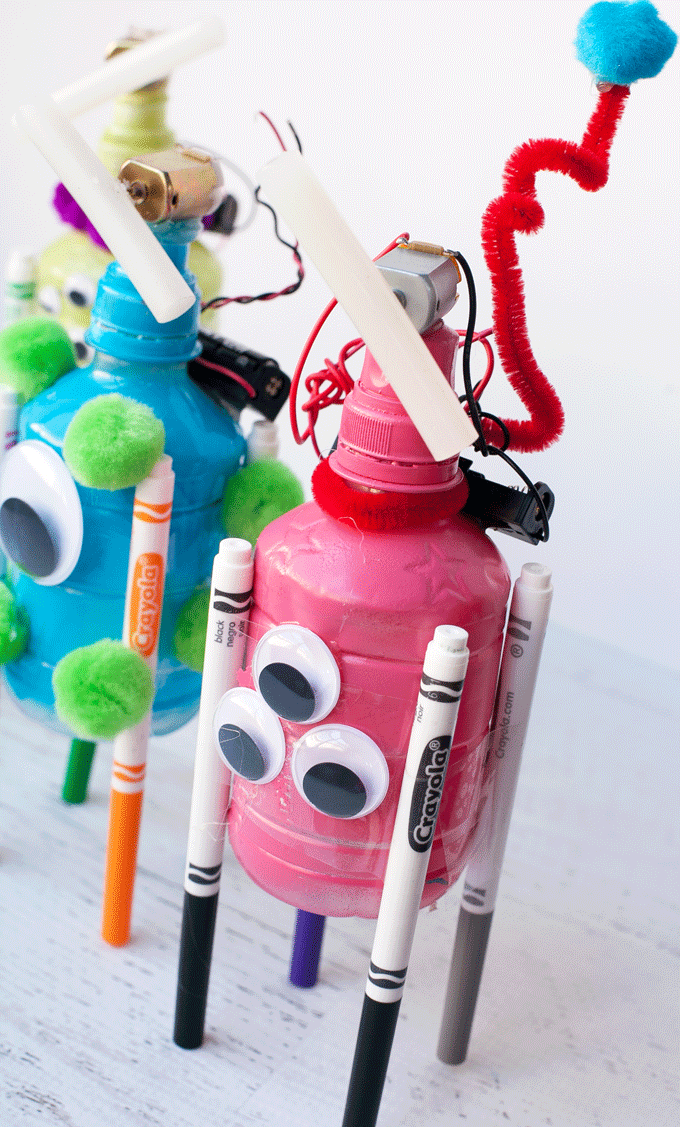
How to Make a Scribblebot – Martian Style
Scribblebot Materials:
- Empty Tum-E Yummies bottle
- Spray paint, color of your choice
- 4 thin markers (buy them here)
- Clear packing tape (buy it here)
- Single battery holder with wires (buy it here)
- 1.5 volt hobby motor (buy it here)
- AA battery (buy them here)
- Googly eyes, pom poms, other decoration
- Glue stick-thick ones work best (buy them here)
Step 1: Prep your Scribblebot Bottle
After the kids “help” you out by emptying their bottles of Tum-E Yummies, rinse them out and remove the label. Keep the lids screwed on for this project.

Put your bottles on a protective surface and spray them all over with spray paint. One coat is enough here. Let the bottles completely dry.

You might want to do this part a few hours before so that the kids aren’t impatient while waiting for paint to not be tacky any more.
Step 2: Put Legs on Your Scribblebot

While this step is easy, you have to take care to get it exactly right or your bot will only draw with three markers or fall over. All the legs MUST be even when you put them on.
All you have to do is take a piece of clear packing tape and tape it to the side of your Tum-E Yummies bottle. Orient your bottle with the top up and the markers with their points to the ground as shown in the photo above.
Place the four markers equally spaced around the outside of the bottle.
Step 3: Build the Electronics for Your Scribblebot
This scribblebot was such a gateway robot for my kids…it was so easy to put together, they wanted to learn more to do more after getting the hang of how circuits work. I’m not going to go into a lot of scientific explaining here (I know you’re here for the crafts!) but it’s worth looking up to teach a quick science lesson!

The wires on your single battery holder will likely be loose when you get them. I recommend twisting them together as shown so they stay a bit neater. Go ahead and put your battery in the pack after you do that.

Put a thick line of hot glue on the back of your battery pack.

Place it on the top of your bottle as shown with the wires pointing up. Let the glue set.

The ends of your wires will probably be straight. Bend them so they look like hooks at the ends. Since this is a super simple project, we’re not building in an on/off switch, and not soldering a thing. These hooks are going to complete the circuit with the motor.

The hooks will go into the contacts you see here on the motor and keep them attached, so it is an important detail.

If you hook the battery to the motor right now, you’ll see that it doesn’t really do anything. The spinner on the motor goes around but nothing happens. Your Scribblebot needs a counter weight in order to create some vibration to get it to move.

You can use pretty much anything, but I like to use stuff I have hanging around (or something close by when I’m solving a problem like this.) I ended up cutting a glue stick down and pushing it on the end of my motor because the glue sticks were sitting there, but in truth, they worked brilliantly.

Now that your motor is weighted, you’ll need to pop the motor on to the top of your Tum-E Yummies bottle. Use a bit of hot glue, and make sure you put the glue on the side WITHOUT the motor contacts. (I have totally done the opposite before and scraping the glue off is a pain!) Position the contacts so that they are facing the battery pack. This will make it easier to hook the wires to the contacts later.
Step 4: Decorate your Martian Scribblebot
NASA makes a lot of robots, but none like these. Here’s where you tie in the creative outer space part to the robot you’re making. We’re going to imagine up what a Martian might look like.
Supply any sort of art materials you want—we went with giant googlie eyes and pom poms. Be sure to leave room for the glue stick to whirl around when the scribblebot is turned on.
Step 5: Turn on your Scribblebot
Put down a large sheet of white paper, or lots of small sheets of paper, on a flat surface. Uncap all the markers.
Hook the wires into the contacts and watch your Martian Scribblebot draw all over the place!
Since we really do believe in recycling, the way the bot was assembled also means it’s easily dissembled with the pieces put away for another project at another time.
Check out Tum-E Yummies website and social channels!
– Pinterest: https://www.pinterest.com/tumeyummies/
– Instagram: https://www.instagram.com/tumeyummies/
– Facebook: https://www.facebook.com/tumeyummies

Paula Biggs
Owner at Frog Prince Paperie
- Valentines Day Ideas
- Tips for Successful Holiday Entertaining
- Art Deco Table Numbers Using the Cricut Maker Engraving Tool
- Look Like a Pro with Cricut Infusible Ink on Coasters
- Mario Brothers Trunk or Treat Ideas
- Zombie Party Ideas and Gruesome Recipes
- Easy Pokemon Party Games and Pokemon Party Activities
- {Tutorial} Sewn Circle Garland
DIY Spinner Art STEM Project - Frog Prince Paperie
Monday 8th of July 2019
[…] Want another great STEM project to try? Check out my tutorial for Scribble Bots! […]
21 Kids Summer Fun Ideas- Merry Monday #209 - Cookies Coffee and Crafts
Sunday 17th of June 2018
[…] How to Make a Scribblebot and Spin Some Science into your Staycation via Frog Prince Paperie […]
Jenny
Saturday 16th of June 2018
This is a fun idea to keep the kids busy this summer and having fun. I'll be featuring this in my 21 Kids Summer Fun Ideas this Sunday at Merry Monday at 6 pm PST. Hope to see you at the party!
Victoria @DazzleWhileFrazzled
Tuesday 29th of May 2018
Very cute! We are officially in our first week of summer vacay so desperate for ideas! Visiting from The Scoop party.