
Someone asked me the other day what kind of decorations can you make for a party with Cricut? The answer is really anything! This Disney princess baby shower has so many details I made with the Cricut Maker and its different adaptive tools I really could not have pulled it off without it!


Disney princess baby shower ideas
If you spend any time on my blog, you know that I don’t love plastering characters all over parties, and instead like a subtle approach to incorporating licensed characters. We are lucky Cricut Design Space has clip art that you can purchase with the Disney characters so you can (legally) get really good quality cuts with real Disney imagery.
In the coming week, I will show you how to make everything in this party. Bur for now, here is the list of the projects in this party I made with the Maker and what you can expect instructions for:
- Tiny tiaras (click for project)
- Princess castle (click for project)
- Princess castle favor boxes (click for project)
- Disney princess quote signs (with Cricut project file and free printable)
- Sleeping Beauty’s bed (click for project)
- Cinderella’s slipper (tutorial below)
- Welcome Princess cake topper (click for project)
- Felt roses (click for project)
- Once upon a time napkins (click for project)
- Balloon arch with tiny tiara topper (click for project)


Amazing what you can make with one machine, right? The most awesome thing about the Cricut Maker is that you can change the tools to cut just about any material. The knife blade cuts chip board (chip board is great for support for paper that needs to stand up), the rotary wheel cuts felt to make fabric roses, and the scoring wheel puts creases in the paper to make 3-D paper projects easy. So many tools and so many ways to use them!

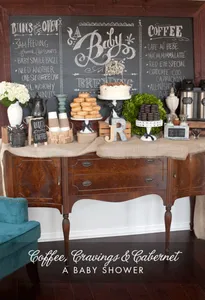
Disney princess baby shower dessert table
I know the Disney Princess baby shower theme been done a thousand times, but I had a friend request some ideas for a shower she is throwing soon, and though, why not? After I started looking around in the projects and images available in the Design Space clip art files, I did get excited about building this party because there were so many possibilities.

There are not a lot of desserts on this table because we are just here for the decorations!

The first thing I found was Cinderella‘s castle. Not going to lie, it was confusing the first time I put the castle together. Lots of pieces and they didn’t make much sense without any instructions . But once I figured it out and this piece was finished, it made the perfect focal point for a dessert table fit for a Disney princess.

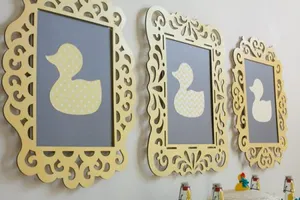
Pretty little signs at parties are a must. There is a cartridge in design space called Disney® – Princess Once Upon a Time that has quotes and silhouettes of several of the Disney princesses.

These are a purchase item, but very inexpensive and worth having the files!

All the framed signs I used are 4 x 6 inches, and you can buy them here. If you have ever had the privilege of cutting out teeny tiny bits of foil lettering with a cutting machine, you know it does not always go well. I ran into this problem with the premade quotes I purchased, so I fixed the problem I making printables to go with the cut silhouettes from the Cricut files.

You print out the file here (click to download), then use the Disney made silhouette from Design Space here, and use the two together to make an impressive and professional looking little sign. If the signs were larger, I totally would have used them as they were shown in the art!

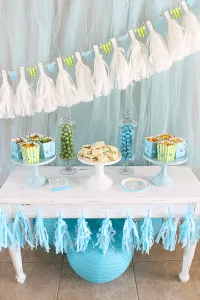
And we cannot forget the balloon arch! My first job was at a party store where part my job was making balloon arches columns, etc. I can tell you that back in the day (30 years or so ago ha ha), we did not have a neat little short cuts that they have now. I purchased this balloon arch kit on Amazon (buy it here), and it took me about half an hour to build the whole thing.
It’s a mixture of white balloons (buy them here), 5 inch pink pearlized balloons (buy them here), and 5 inch pearlized blue balloons (buy them here). Video soon!

One of the easiest projects you can do with your Cricut Maker is to make cupcake toppers. A little glitter card stock, a toothpick and a piece of tape and you have a pretty accent for your treats. You can see the files here in Design Space for my toppers, or get inspired to make your own!

Disney princess shower tablescape ideas
Admittedly, it’s been a while since I have really had this much fun putting together a table. While this is a “Disney Princess” themed shower, it’s really about the Disney princesses welcoming the new baby into their princess sisterhood. They’ve all left little presents for the baby around the party and a word or two of advice to go with them.

The frog with the crown is my favorite, and my office mascot. He was a perfect peace for Tiana to give to baby princess. After I painted him gold.

She reminds the baby princess that she’s gonna kiss a lot of frogs in her life…but there’s one out there that is going to be perfect for her.

Ariel dropped a starfish off with a note to call her on her shell phone anytime.

Belle tries to set the little princesses priorities straight early on, and remind her that books are better than boys!

Sleeping Beauty went to big and dropped off a bed. I’ve set up this project file in the Cricut here for you to make yourself, but will post a tutorial soon.

Definitely never underestimate the power of a good nap.


The fairy godmother had to make an appearance, too! Her gift is an alarm clock with the reminder that midnight is an important time. (Probably for feeding in the baby princess’ case!)

Cinderella’s slipper is all girl. Whatever shoe you’re dealt in life, Cindy says to wear it and wear it proud. This project was made with the Cricut Knife blade.

This project (and any of the other large projects in this post!) make perfect DIY princess party centerpieces.

Cinderella's Slipper
Cinderella's slipper as a decoration for a Princess party or Princess baby shower.
Materials
Tools
Untitled Group
- Cricut Maker
- Cricut Knife Blade
- Cricut Fine point blade
- Standard green cutting mat
Instructions

- Use the knife blade to cut the heel and smaller circle out of chipboard. Use my detailed instructions here using the knife blade to cut chipboard. Good details and hints in this post you'll want to know!
- Cut the slipper, large circle, and blue paper bow out of the cardstock(s).

- Use a glue stick to glue the silver glitter cardstock to either side of the chipboard cut out. With paper on both sides, no matter which angle the slipper is seen from it will be sparkly!

- Place the large gold glitter circle over the smaller chipboard circle with a little glue stick to adhere them together.
- Use a glue dot or hot glue to adhere the blue bow to the toe of the slipper. (Glue stick does not stick well to glitter card stock.)

- To make the heel stand up on the cardboard, all you have to do is add a healthy dose of hot glue to the base and then hold the shoe in place while the glue sets. The slipper is lightweight enough that it will not require a lot of structure once the glue is hard.

- Add the flourish to the gold base.

- Add a few rhinestones for a little extra sparkle.
- Add the cut quote from Cinderella if you wish!

Recommended Products
As an Amazon Associate and member of other affiliate programs, I earn from qualifying purchases.


At my local craft store I found a round carriage. It was hot pink when I purchased it – – the piece was completely the right shape, just the wrong color. A little white spray paint fixed that! I put a pouf inside to give it some visual weight on the table.

Disney princess baby shower place settings
Some people might think this is a little extra, I really loved making custom napkins for this shower. You can purchase bulk napkins on Amazon for not much (buy them here) and then customize them for any occasion. Like a princess baby shower. You can find the file to make these here. I used gold foil iron-on and pink foil iron-on from Cricut and a quick press with my mini EasyPress 2 to make them in about 10 minutes.


The place settings are everything layered in gold and pink that I could find! Gold beaded placemats, gold patterned plates, and pink glasses with gold rims. We even have silverware with a gold accent.

Together it’s all sparkly and royal. With such a variety of pieces around the table, each setting gets to look very unique!

Other Disney princess baby shower ideas
Julia child once said a party without cake is just a meeting. So don’t forget the cake at your baby shower! And if you have a cake you must have a cake topper. Cricut makes it very easy to make custom cake toppers for every event.

I show you how to design your own cake topper in this post here. I made this one that says Welcome Princess for this occasion. You can find that file here on design space. It is made from just a single layer of glitter card stock and two bamboo skewers.
And let’s not forget about the felt roses! They’re cut with the rotary blade on the Cricut Maker from a Simplicity pattern available on Design Space. The felt roses are beautiful little accents you can place everywhere. I also used these in an American Girl party, and they were just as cute!

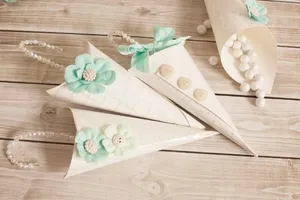
Part of being a good hostess is making sure your guests leave with nice memories of the party, and maybe even a party favor. Custom boxes are also no problem with Cricut! These beautiful little castle favor boxes were cut specially with a castle in them from white glitter card stock, pink foil poster paper. Use the file here and don’t forget your scoring wheel for this one.

Wrap each with pink ribbon, and top with one of the tiny gold foil tiaras. It’s a sweet little gift to send home with your guests once filled with something sweet!

Teeny tiny tiaras make everything cuter! A quick run through the Cricut Maker and you can make dozens to decorate a bajillion ways.

Enjoy the party, and all the great things your Cricut Maker can do!
This is a sponsored conversation written by me on behalf of Cricut. The opinions and text are all mine.
Related Ideas


Paula Biggs
Owner at Frog Prince Paperie
- How to use AI to plan a Scavenger Hunt for Teenagers
- Valentines Day Ideas
- Easy Valentine Craft – Paper Heart Garland with Cricut
- DIY Neighbor Gift – Monogram Blanket
- Zombie Party Ideas and Gruesome Recipes
- How to Make Paper Poinsettias
- St. Patrick’s Day Easy Home Decor
- Easy 30 Minute King Cake Recipe for Mardi Gras
Monique
Friday 24th of May 2024
I'm trying to do the printable frames but when I go to print them, it comes out weird and adds the silhouettes. Please help!
My Homepage
Wednesday 28th of July 2021
... [Trackback]
[...] Read More: frogprincepaperie.com/disney-princess-baby-shower-with-the-cricut-maker/ [...]
Bb
Monday 11th of February 2019
Love this! How did you make the frames? What type of foil did you use? Do you have a step by step on how you made them?
Nikki from Tikkido
Wednesday 9th of January 2019
Aaaaah I'm not even a huge Disney fan and I LOVE IT! The crowns on the balloons are my favorite little detail--and clever little details like that absolutely MAKE a party.
Paula Biggs
Wednesday 9th of January 2019
I totally agree! Parties--even Disney Princess parties--are so much better when there are fun details!