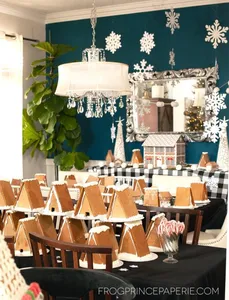
Not going to lie. This reusable gingerbread house centerpiece is one time-consuming project, but it’s pretty cool to have in your house for a gingerbread party like this one or just for the holidays. You’ll need a Cricut Maker machine (buy it here) with the knife blade attachment to cut all the pieces out. There are so many pieces to the project, it had to be broken into two project files, so be sure to catch them both!

A string of lights on the inside of the gingerbread house give it a gentle glow, making it all the more merry!
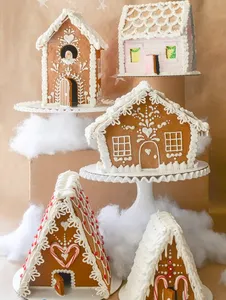
 Add a few of the kraft paper mini houses in this tutorial to complete a whimsical gingerbread village.
I was just bragging to my dad today about the precision that you get using the knife blade to cut thick pieces with the Maker. I know if I had to make this project with an exacto knife, I would have lost my patience and given up after the first window, and it certainly would not have looked as clean and pretty. So many creative opportunities open when you use the Maker! 
How to make a resuable gingerbread house centerpiece
This project uses white vinyl, 2 mm kraft chipboard from Cricut, and a very small amount of red cardstock. Assembling the project is not difficult at all, but you will need some time to get it done as there are a lot of the pieces to cut out and the knife blade takes fair amount of time per piece.
Materials:
- 11 Cricut kraft heavy chipboard, 2mm
- 2 rolls 12×48-inch Cricut Vinyl, white
- Transfer tape
- 6 sheets Vellum
- Red cardstock
- Blue Painter’s tape
- Gingerbread house front project file
- Gingerbread house side project file
- Christmas string lights
Other items:
- Cricut 12×12 mat
- Cricut 12×24 mat
- Cricut Knife Blade for the Cricut Maker
- Cricut fine point blade
- At least one old cutting mat that is not sticky any longer
- One sticky cutting mat


KNIFE BLADE CUTTING TIP: As I have noted in other posts using the Cricut Maker knife blade, when you put the 2 mm chipboard on your mats, you will have to tape them down. I recommend checking out this post here where I fully explain using the knife blade to cut chipboard. Good stuff in there. 
Cut out your gingerbread house walls
You’ll use the knife blade attachment to cut out all the chipboard. Be sure to grab the files from both the front and sides of the gingerbread house. There are two files because I found out while designing this house that Cricut Design Space has a limitation for the number of shapes you can have in one project file. Pretty proud of myself for finding the max!
And on another note, because we are limited by the size of the 11 x 11 chipboard, the walls of the gingerbread house have to be cut in small pieces and then assembled into a solid wall. Adjust the size of the size of the project files if you’d like something smaller (or bigger!)
The standard mats are perfect for the chipboard and cardstock, but you’ll need to use the 12 x 24 inch mats for the vinyl.

After you finish cutting the chipboard, you should have:
- 11 squares with two windows
- 1 small square with no cut outs
- 2 rectangles with four windows
- 2 peaked roof pieces
- 4 large rectangles
- 9 semi-circles in various sizes
- 1 door

The cricut made gingerbread house front wall
The front wall of the gingerbread house will have five squares with two windows in each of them. There will be one square with no windows or doors cut into it. This one goes on the bottom row in the middle.
Because these walls will end up being a fairly large once they all taped together, I placed some shims along the seams for a little extra structure. Really, if these shims were just scrap pieces of chip board from cutting the squares that were thin enough to be placed between in the windows. Nothing fancy!
When you have the front wall laid out on the table, tape the seams together with whatever tape you have handy . Place the shims over the seams, and then tape the shims to the seams. Make sure you do one horizontal and one vertical brace at a minimum. The shims will also help the walls and stand up properly where are you assemble the walls into a box/house shape.
While you have the wall flat on the table, you will want to place vellum over each of the window openings. You don’t need to be precise with these, just grab a pair of scissors and cut the vellum to the size of each window, which will be different for each window depending on the size of your shim. Just be sure the openings are completely covered, and then tape down the vellum with clear tape.

The gingerbread house back wall
The back wall has six squares with two windows per square. Tape them together as shown in the photo above, and add shims for support. Add the vellum to the windows.
The gingerbread house side walls
There will be two pieces to tape together here. One will have a peaked top to support the roof and four window openings. The other it will be a rectangle with four windows in it. The peaked piece goes above the rectangle. Tape them together and add a horizontal shim. Add the vellum to the windows.

The gingerbread house roof
The roof is four pieces. Tape them all together, but do not add shims. It will be OK on its own!

The gingerbread house steps
Using a glue stick, glue together the half circles according to size.

You’ll end up with steps when you are done and they are stacked on top of each other.

Adding vinyl to your cricut made gingerbread house
So much less messy than frosting! Vinyl makes adding gingerbread house type decoration quick, easy, and precise. After each of your walls are taped, you need to flip them over to put on the vinyl before final assembly. That means place them on the table so the untaped side is showing.

Vinyl on the windows
It is very difficult to transfer the entire front of the gingerbread House at once, and breaking it up into individual windows was the easiest way to apply the decorations.
 Use transfer tape to pick up the dots around a pair of windows at a time and apply to the chipboard. Each window on the house gets a set of dots!
Vinyl on the front door
The front door at the gingerbread House has its own vinyl decor. I did not use transfer tape to apply it, I peeled it up off the carrier sheet and placed it on the door.
Adding ric-rac to cover the seams
The super long ric-rac pieces of vinyl go horizontally across the gingerbread house to cover seams. You don’t need transfer tape, just peel them up and stick them on. The shorter ric-rac pieces go over the vertical seams in the gingerbread house. Do this for each of the walls.

You will have several very wide pieces of ric-rac that go on when we are done assembling the house.
Putting vinyl on the gingerbread house roof
To put the scalloped vinyl on the roof of the gingerbread house you will need to use transfer tape. Be sure to fold the roof to the same size as the vinyl piece before you place the vinyl on.

Assembling the reusable gingerbread house
Lay out your wall pieces across the table in the order they will be taped together: front wall, side wall 1, back wall, then sidewall 2. Tape each wall to its adjacent wall.
After you have all four pieces taped together at the sides, pick up the walls and place them upright and fold so the walls form a box. The house should stand on its own at this point. Reach through the top of the box and tape the last wall wall joint; this needs to be on the interior of the box. After this last corner is taped, your house will be freestanding!

Use a hot glue gun (or a couple of the glue dots) to adhere the front steps to the middle at the house on the front. Put glue dots or hot glue on the back of the door and press it to the front wall over the steps.

Make your bows for the front door and between the windows.
Bend the bow ends to the middle and a glue down. Wrap the middle with a small piece of red card stock and blue theme in the back. I liked using glue dots to put these on the house. It was easiest!
Final gingerbread house assembly
Put your house frame where you plan to display your gingerbread house. Grab a string of Christmas lights and drop it into the gingerbread frame, then plug in the lights. You can put them in through the roof or under the back wall, your choice.
Fold the roof of the gingerbread house and place it on top of the gingerbread house frame. You can secure the roof if you like, but I left mine loose because I planned to flatten the house and bring it out again next year. This is up to you!

When you display your DIY reusable gingerbread house, place a few of the craft paper gingerbread houses in this post around it. It makes a beautiful little gingerbread village that flickers at night! This is easily one of the favorite Christmas crafts I’ve ever made!
Related Ideas


Paula Biggs
Owner at Frog Prince Paperie
- Valentines Day Ideas
- Gnome Trunk or Treat Ideas
- Boo Cup Halloween Boo Your Neighbors
- Personalized Christmas Pajamas with Cricut Explore Air 2
- Art Deco Table Numbers Using the Cricut Maker Engraving Tool
- How to Throw a Teen Movie Night, Princess Bride Style
- DIY Christmas Shirt for Swimmers – H2O H2O H2O!
- Morning Coffee Quotes Free SVGs