
Every year it’s a family squabble over what trunk or treat idea we’re going to use…this year, we (or rather I) decided on a a Dead Disco trunk or treat theme! We’re really missing the whole car part of the equation in these pictures, as we didn’t get out to an actual trunk or treat this year due to schedules, but it didn’t make it any less fun! We’ll call it a Halloween Driveway Display. Disco balls, marquee letters, light up balloons and some groovy tunes made this trunk a serious treat.

The Dead Disco Build
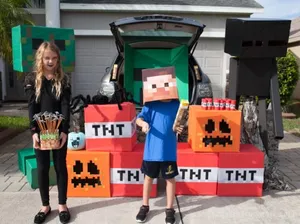
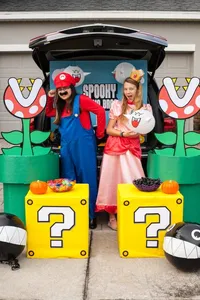
After putting together the Gnome Garden, SuperMario Trunk or Treat and the Minecraft Trunk or Treat, I have to say this was pretty much the easiest one I’ve done to date. Most of it was courtesy of Amazon Prime, the Dollar Tree and stuff I already had on hand.
Our dead disco trunk or treat started with the marquee letters, and then I needed some height and lights! I took one of my photo backdrop sets, tied some weights to the feet so they didn’t blow away, and put up a balloon arch over it.

My driveway fits two cars, so I had a bit more space to fill. I took another two backdrop stands and made balloon columns to fill up the space. If you’re packing up into a trunk, you’d skip these columns unless you wanted to take up the whole parking lot!

I was scrambling to add some more “dead” to our dead disco, so I topped my columns with some glitter skulls I had in my halloween decorations. Not a total decorating win, but whatever. They worked enough.


A detail I think only got seen in pictures were the headstones in our disco graveyard. I picked up the headstones at the dollar tree, then slapped a piece of paper over the existing writing to make them say what I wanted. If I’d had more time, yes, I probably would have painted something up, but October was so crazy this build had to go super fast. I was able to do more of them since it only took a minute or two to put together. Because it was so windy that day, I had to build supports for the back and weighted them down with canned food.

The crowning glory to any trunk or treat (or driveway) display is always the costumes. Don’t forget this part when you put yours together–no matter the theme!! Again, short on time that day, so my plans of being a zombie disco queen to match my “dead” disco theme didn’t happen, but being in full disco regalia ended up being enough!

Disco Treats
I always try to hand out a treat that matches our trunk or treat theme – pickaxe pencils at the Minecraft trunk or treat and mustache whistles at the Mario Brothers trunk or treat for example. For our disco trunk or treat, I found some inexpensive DISCO BALLS! The squeals of delighted kids were so great to hear when they saw them on our treat table. Alternatively, disco ball ornaments would work here!
My house also regularly gives out full size candy bars and blinkie rings. It’s a personal choice, but I remember how magic it was getting a big bar in your trick or treat bag as a kid, so I like passing that on to this generation. I also may love being “that house” in the neighborhood a little too much.
There’s always an additional big bowl of toys for the kids to sift through. I have a drawer in my house full of trinkets that have been collected from photo shoots and other things throughout the year and I dump them in a bowl to let the trick or treaters pick through. You would be amazed at how many kids pick a toy over a candy bar!!
Disco Music
Apple music has a playlist called “Disco Essentials.” Our old outdoor speaker died this year, so I bought this new loud outdoor bluetooth speaker and it was perfect. My whole block could hear it and all the neighbors stopped by and said they were loving the DJ effort that night!! The music might have inspired me to boogie down in the driveway all night long…and good music is another one of those essentials in setting the scene for your trunk or driveway display.

Making Dead DISCO Marquee Letters
The dollar store is forever a fabulous resource for supplies; I picked up all my foam core there to make my letters. The quality showed when I spray painted the letters as the paper warped a bit, but for something so temporary that was going to be seen at a distance in the dark I didn’t worry about it too much.
What I used:
- 12 sheets 20×30 foam core
- Silver mirror spray paint
- Battery-operated bulb lights
- Green LED fairy lights
- Batteries
- Hot glue
There are a ton of how to make marquee letter tutorials out on the web, so I won’t bore you with that, but I’ll show you a few of the process pictures to make you feel better about taking on a project like this.

First, I drew the letters onto the full sheet of foam core. I did use a ruler to make sure everything looked like it should!

The remaining pieces of foam core were cut into 5-inch strips. I bent the strips around the edges of the letters and hot glued them on. I would have liked for there to be less bend marks in the foam core, but as I said before, no one was going to notice that but me. I think a better quality foam core probably would have given better results.

I punched holes three inches apart along the middle of every letter, then spray painted them all. After removing the bulb coverings from the lights, I threaded them through the letters. The bulbs were placed back on the lights after to secure them to the piece. A big pack of batteries is going to come in handy for these lights.
Disco Costumes
Normally, I’d sift through the local thrifts to find costumes for a disco theme, but I didn’t have a spare minute this month. To outfit four of us, I bought a whole lot of stuff on Amazon. Not all of it worked, but this is what we picked up:
- Womens Disco Dazzler Costume
- 70s Gold Lame Jumpsuit
- 70s Disco Costume Set Disco Shiny Shirts
- Saturday night fever disco suit
- Paisley Shiny Shirt
- Hot pink shiny bell bottoms
- Gold sequin tube top
- Disco accessory set
- Afro wig
- Platform heels
I could have bought some great bell bottoms for the guys, but opted to just let them wear their own black pants. When you’re creating a trunk or treat, don’t forget YOU are part of the decorations! A coordinating costume is a must!
*After investing in all these groovy disco costumes, we also used them for our annual Christmas card picture. It was epic.
Building a Balloon Arch
The decorating strip tape that comes with a balloon arch kit makes creating one of these frothy arches so incredibly easy, and it’s why a balloon arch was a winner at the disco trunk or treat. Basically, you blow up and tie off your balloons, then stick the balloons through the holes in the tape until your arch is as big as you want it.
Now, the balloons you use are going to totally affect the look, so buy a balloon arch kit, or be concious of what you’re purchasing for your finished product. You need your balloons to be a few different sized to create a visual appealing look. The Disco balloon arch used these balloons:
- 12-in Black latex balloons
- 9-in Black latex balloons
- 12-in Dark metallic purple latex balloons
- 12-in Light metallic purple latex balloons
- 12-in Black and white marble balloons
- 18-in Black latex balloons
- Disco ball mylar balloons
- Light up balloons
What really made the arch (and columns) were the clear light up balloons.

Here’s another shot of them. I was very very unsure of this product when I bought it, but they were amazing!! Buy a big pack of batteries if you use them!
As a side note, i had ordered a balloon arch kit in black and purple from Amazon, but the envelope arrived empty the day before Halloween. I had one in my stash for a unicorn party I’d never done, lots of gold balloons and I raided Walmart for the black and marble balloons to finish things off. If you’ve got to buy individual bags and only need a few, Walmart is probably cheaper, but if you’re buying 40 or 50 of the same color, buy on Amazon in bulk.
Putting the Balloon Arch Together
After all the balloons were filled, I threaded the ends of the latex balloons through the holes in the decorating strip in a four black, three colored balloon pattern. Once I had it the length I wanted, I tied the arch to my backdrop frame. From there, I used glue dots and string to add in the mylar disco ball balloons and light-up balloons. But as an FYI, string is far more durable and will stay in place better especially if you’re going outdoors with your display.
Necessary Balloon Arch Building Items
If you want your balloon arch project to go FAST, there are two products I highly highly recommend:
I have held off on doing an awful lot of arches because tying that many balloons always rubs all the skin off my fingers. And that’s not disco. The little tool saves your fingers and making tying off balloon go a whole lot quicker.
The balloon pump is a no brainer; we used to use an air compressor, but this table-top machine is compact and much quieter to use. There are even some models that have two nozzles if you’re working with a pal!

Go Get Groovy!
It’s so funny that months later, I’m still hearing about the disco trunk or treat (or rather, disco driveway display). These ideas are totally perfect for any disco party you throw as well!
Related Ideas


Paula Biggs
Owner at Frog Prince Paperie
- Valentines Day Ideas
- Tips for Successful Holiday Entertaining
- DIY Pikachu Costume for a Pokemon Halloween with Cricut
- Disney Princess Baby Shower with the Cricut Maker
- First Day of School Free Printable
- Pikachu Ears Pokemon Party Activity
- Graduation Party Favor Free Printables, Tutorial and DIY
- Gingerbread House Tutorial and How-To…From a PRO!