• Skip to primary navigation
  • Skip to main content
  • Skip to primary sidebar
  • Home
  • Blog
  • parties
  • tutorials
  • printables
  • Shop
  • Contact

Frog Prince Paperie

Where parties start with a kiss of magic

 
You are here: Home / DIY Tutorials / Easter Bunny Marshmallow Pops Tutorial and How-To

March 29, 2012

Easter Bunny Marshmallow Pops Tutorial and How-To

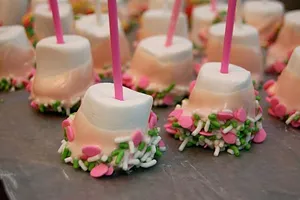
 Easter Bunny Marshmallow Pops! It doesn’t get any cuter. Nestled into a terra cotta pot with some paper shred, they’re darling on a dessert table.

And these marshmallow pops aren’t necessarily one of those projects where you’re going to tear your hair out making them. It’s pretty much a candy dip and sticking some ears on top. But read thoroughly through the directions before you begin. The gum past needs some time to harden before use, so these bunny pops aren’t necessarily a last minute project!

Affiliate links ahead–they cost you nothing, but help keep our content free!

Bunny Marshmallow Pops

How to make Easter Bunny Marshmallow Pops

Making these marshmallow pops is fairly easy, even if you aren’t familiar with all the ingredients. Gum paste is rather like play-dough to work with with the added benefit of hardening really well when left to dry. If you can pick up one of the long rectangular pieces of Styrofoam from the Dollar Tree, that usually works perfect for projects like this where you need a place for your candy coated pops to dry for a few minutes!

PRO TIP ON CANDY MELTS: All melts are not created equal! I really like CandiQuik (usually in the grocery store) and Merckens (find it here) because they tend not to seize when you melt them in the microwave. I’m a lazy baker/candy maker so I go for easy every time, and the brands you can buy at the craft stores tend to get crumbly instead of melty smooth when they get nuked. Some brands cost a bit more, but believe me when I say they’re worth paying for so you’re not buying multiple bags to get one good pot of candy melt!

You’ll also note the complete lack of gluten in these marshmallow pops. They’re a perfect gluten-free treat for Easter!

Easter Bunny Marshmallow Pop Materials:

  • White gum paste (buy it here)
  • White candy melts or candy coating (I used CandiQuik)
  • Large marshmallows (one per bunny pop)
  • Pink triangle candies (found at Michael’s, but heart sprinkles like this would also work well!)
  • Lollipop sticks (one per bunny pop, buy them here)
  • 1/4 inch ribbon (optional)
  • Glue dots (optional)
. 
Bunny Marshmallow Pops
. 
1. Remove a small amount of gum paste from the bag and roll into a ball and flatten to approximately 1/8″ inch thickness.
 
. 
2. Use a knife to cut bunny ear shapes out of the gum paste.  I made sure that mine were really pointy bunny ears at the bottom, in order to help them stick into the marshmallow later on.
 
. 
3. Set the gum paste ears aside to harden.
 
. 
4. Insert the lollipop sticks halfway into the bottom of each marshmallow.
 
. 
5.  Once the gum paste ears have hardened, follow package directions on bag of candy melts to heat
until they are melted to a smooth consistency.
 
No microwave directions? The best way to get the perfect consistency for your melt is to microwave for 30 seconds and stir, then 15 seconds at a time then stir until your melts are perfectly smooth.
 
. 
6. Dip a marshmallow in the candy melt until coated. Let the excess candy drip off for a second.
 
. 
7. Add a candy triangle (or heart) nose.
 
. 
8. Insert the hardened gum paste ears in the top of the marshmallow, pressing through the candy melt and pushing them slightly into the marshmallow.
. 
9. Place the bunny pop into stryofoam while the candy coating sets.
. 
10. Repeat steps 6-9 until you have made the desired number of bunny pops.  Keep an eye on the previously made bunny pops, as you may need to adjust the ears as the candy coating hardens.
 
11. It’s optional, but I really love the way the bunnies look with a little bow on them! Tie a small bow with your ribbon, then add to the lollipop stick with a glue dot (or hot glue if that’s your jam.) Just be sure to wait until the pops are completely hardened for this part or you might end up with a messy ribbon. 
. 
. 
Bunny Marshmallow Pops
Hope the step-by-step made this project look a little less scary!
 

And don’t forget to pin this post for later—>

P

Please help us keep our servers running and our content free–shop for supplies using our affiliate links! Thank you!
Wilton Ready To Use Gum Paste
Wilton 710-167 Sprinkles Essentials, Set of 4
Wilton White Candy Melts, 12-Ounce
Lollipop sticks 100 count 6 inch
Wilton Primary Candy Color Set
InLinkz.com


More ideas like this

Filed Under: DIY Tutorials, Easter, gluten free, recipes, tutorials Tagged With: dessert buffet, dessert table, diy, easter, easter bunny, marshmallow pop, tutorial

Never Miss a Post!

Reader Interactions

Comments

  1. Alejandra Morin {The Marshmallow Studio} says

    March 29, 2012 at 10:30 am

    LOVE!!! Super cute and super easy to make. Thanks for sharing 🙂

    Reply
  2. Beatriz says

    March 28, 2013 at 11:00 pm

    It’s so cute! I like it! I think that it a good idea to make for a children’s party.

    Congratulations!

    Reply
  3. Beverly says

    March 1, 2015 at 9:42 pm

    These are just too adorable. Great idea!
    Bev

    Reply
  4. Linda Bauwin says

    March 4, 2015 at 11:47 am

    Love it, will be giving this a try. Thanks for sharing.
    Linda Bauwin – CARD-iologist
    Helping you create cards from the heart.

    Reply
  5. Diana Rambles says

    March 6, 2015 at 10:48 am

    Those are so adorable!!

    Reply
  6. Cindy @ Hun... What's for Dinner? says

    March 9, 2015 at 1:08 pm

    These bunny marshmallow pops are super cute! I am featuring you this week, over at Simple Supper Tuesday. We hope you can join us again, starting Monday night at 8pm EST.

    Reply
  7. Kristen says

    March 10, 2015 at 11:29 pm

    Omg, these are so adorable! I totally want to make these for Easter!

    Reply
  8. Jacqui says

    March 11, 2015 at 12:32 pm

    I love how simple and cute this is. Thank you for linking up to Party Time and we hope to see you again next week!

    Reply
  9. Nicola - Pink Recipe Box says

    March 12, 2015 at 3:52 am

    These are the most perfect Easter bunny pops I’ve ever seen! Pinning 🙂

    Reply
  10. Andrea@TablerPartyOfTwo says

    March 15, 2015 at 12:45 pm

    Loved this post and you were one of my featured posts on Sunday Features today! https://www.tablerpartyoftwo.com/sunday-features-link-party-16/

    Reply
  11. laura says

    March 20, 2018 at 8:46 am

    Adorable! Thanks for sharing on Merry Monday Link Part!
    laura

    Reply

Leave a Reply Cancel reply

Your email address will not be published. Required fields are marked *

Recipe Rating


This site uses Akismet to reduce spam. Learn how your comment data is processed.

Primary Sidebar

Meet Paula

My father came home from a trip for work when I was a little girl toting a huge (to me) book of fairy tales. I was instantly smitten with the beautiful illustrations and the stories that came alive from those worn pages. My favorite was always the frog prince…my mother read it to me over and over (and over.) Read More…

Sign Up for our FREE Newsletter

OUR STORY   |   PRESS   |   TOPICS   |   POLICIES   |   CONTACT US

Copyright© 2020 · Frog Prince Paperie · Genesis theme customized by Grits Design · Professional Blog Hosting by House of Ideas