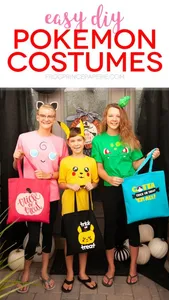
The happiest kid on the block this Halloween? It’s going to be the one standing in his DIY Pikachu Costume at the neighbor’s door with his arms outstretched holding a matching Pikachu trick-or-treat bag asking for candy. I want to pinch his cheeks already! 

You can be the one to put the smile on your Pokemon enthusiast’s face this Halloween with a super quick and easy to make Halloween costume. Cricut makes it SO SIMPLE to do. In this post, you’ll learn how to make the DIY Pikachu shirt, Pikachu Ears and a super cute Pikachu trick-or-treat bag.

How to make a DIY Pikachu Costume with coordinating Trick-or-Treat Bag
The materials for this DIY Pikachu costume are readily available at any craft store. T-shirt and canvas bag blanks are plentiful these days thanks to Cricut and the EasyPress; it’s easier than ever to custom make shirts at home.

A pair of Pikachu ears tops off the t-shirt to make a complete DIY Halloween costume. These ears first made an appearance at a Pokemon birthday party and are an easy activity for your kids to get in on making with you. Click here for the Pikachu Ears tutorial.
A note on materials
In the projects below, I used Cricut SportFlex Vinyl. It’s my favorite and always my first pick if it’s available. SportFlex is immensely easy to weed and it tends to press on in one try.

I love that it flexes and stretches with my shirts and goes on just about any material with ease, and comes with Cricut’s Strong Bond guarantee. I’m sure you have your own vinyl preferences, but if you have a chance, pick up a roll for your next project!

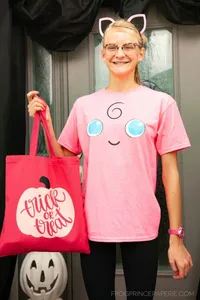
Have a Pokemon lover? This DIY Pikachu costume will make their party or Halloween dreams come true. Bonus? With a Cricut Explore Air 2 or Maker machine, it'll take less than 20 minutes to make. T-shirts come in all sizes and widths! To make sure your image is going to look right on the shirt you have chosen, be sure to measure the space you want the image to fit in. For this project, I used a Youth medium shirt, and the graphic is 7 inches wide. Click "MAKE!" This design is perfectly symmetrical and doesn't have any words, so don't worry about mirroring. Choose the correct Vinyl type, and if you're using the Explore Air 2, adjust your knob accordingly. PRO TIP: Cricut SportFlex has a super slick back. To make sure that the vinyl does not move while cutting, use a few pieces of washi tape to tack it to the mat. Warm up your EasyPress 2 to 315 degrees and set the timer for 30 seconds. You can use towels if you don't have an EasyPress mat, but the mat is one of the best crafty investments you'll make as it will make ironing on vinyl SO much easier to do. Put your t-shirt on the mat (or put it inside the t-shirt.) PRO TIP: The rule of thumb for centering vinyl on shirts is to place the top of the design three finger widths down from the bottom of the shirt collar. Peel up the plastic carrier sheet from the vinyl. The Pikachu shirt is a great costume start, but it's complete with a set of Pikachu ears. Catch the tutorial in this DIY Pikachu Ears post. They are just as fast and easy to make as the shirt, and your kids can even help! As an Amazon Associate and member of other affiliate programs, I earn from qualifying purchases.DIY Bulbasaur Costume
Materials
Tools
Instructions
 Preparing your Pikachu costume for Cricut Cutting
 Open the Cricut Design Space file. Select all the items on the page and resize to the correct width.
 Cutting your Pikachu pieces
 Put your iron-on vinyl on the sticky mat shiny side down and put it in your machine. Cut all three pieces of vinyl for the DIY Pikachu shirt.
  Weed the vinyl- I find the Cricut weeding tool to be most convenient.
 Assemble your Pikachu Costume
 Your EasyPress should be heated up. Warm up the t-shirt by pressing it for 15 seconds.
  Place the black vinyl piece on the shirt.
 Press the vinyl for 30 seconds with pressure. LET COOL COMPLETELY if you are using SportFlex vinyl. It's tempting to do it sooner, but that usually leaves you with a wrinkly mess.
  Place the red circles for the cheeks and the white spots for the eyes onto the t-shirt at the same time. If you've got a lot of extra carrier sheet that may prevent the vinyl from adhering to the t-shirt, trim the carrier sheets down a bit with a pair of scissors.
 Press the vinyl for 30 seconds with pressure. LET COOL COMPLETELY then peel up the plastic carrier sheet from the vinyl.Pikachu Ears to complete the costume
Recommended Products
 You’re going to need a bag to go with that adorable Pokemon shirt!!


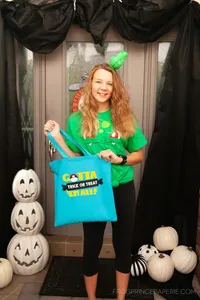
DIY Pikachu Trick-or-Treat Bag
A DIY Pikachu costume is not complete without a Trick-or-Treat bag!
Materials
Tools
- Cricut Cutting Machine
- Standard Grip Cutting Mat
- Cricut Weeding Tool
- EasyPress Mat
- EasyPress 2 heat press
Instructions
Preparing your Pikachu Trick-or-Treat bag for Cricut Cutting
If you didn't get the canvas bag linked to in the materials, be sure to measure the space you want the image to fit in.
Open the Cricut Design Space file. Select all the items on the page and resize to the correct width or height to fit your bag if necessary.
Cutting your Pikachu Trick-or-Treat pieces
Click "MAKE!" Be sure to mirror your images before cutting!!! Choose the correct Vinyl type, and if you're using the Explore Air 2, adjust your knob accordingly.
Put your iron-on vinyl on the sticky mat shiny side down and put it in your machine. Cut all pieces of vinyl for the DIY Pikachu trick-or-treat bag.
PRO TIP: Cricut SportFlex has a super slick back. To make sure that the vinyl does not move while cutting, use a few pieces of washi tape to tack it to the mat.
Weed the vinyl.

Assemble your Pikachu Bag
Warm up your EasyPress 2 to 315 degrees and set the timer for 30 seconds.
You can use towels if you don't have an EasyPress mat, but the mat is one of the best crafty investments you'll make as it will make ironing on vinyl SO much easier to do. Put your canvas bag on the mat (or put it inside the bag.)
Your EasyPress should be heated up. Warm up the canvas bag by pressing it for 15 seconds.
Iron the pieces on in this order:
- Yellow pumpkin
- Black ear tips and white eye highlights
- Red cheeks
- White trick or treat wording
Press the vinyl for 30 seconds with pressure. LET COOL COMPLETELY if you are using SportFlex vinyl. It's tempting to do it sooner, but that usually leaves you with a wrinkly mess.
After each piece of vinyl is pressed, peel up the carrier sheet and keep to the side. Place down the next piece of vinyl and cover any exposed vinyl that's already pressed on with the reserved carrier sheets.

The DIY Pikachu Trick-or-treat bag is a perfect compliment to the DIY Pikachu costume shirt is and DIY Pikachu Ears.
Recommended Products
As an Amazon Associate and member of other affiliate programs, I earn from qualifying purchases.
 More DIY Pokemon Costume Ideas
There are more than 800 different Pokemon in the Pokemon universe…so if Pikachu isn’t your kid’s favorite, there are others to choose from! See my Pokemon Costume Ideas post for more ideas!

Every costume has a trick-or-treat bag to go with it!
This is a sponsored conversation written by me on behalf of Cricut. The opinions and text are all mine.
Related Ideas


Paula Biggs
Owner at Frog Prince Paperie
- Valentines Day Ideas
- Tips for Successful Holiday Entertaining
- Top Halloween Ideas for Kids
- How to Make Tissue Paper Pineapple Pouf & Flamingo [Luau DIY]
- Cricut Sportflex Strong is the New Pretty Workout Shirts
- Family New Years Eve Party: Pajama Party Down!
- First Day of School Mini Schultüte
- Sugar Skull Face Painting with Tulip Body Art Paint
Amy
Thursday 17th of November 2022
I was trying to link to your super cute design space files but the links don’t work. Am I doing something wrong?