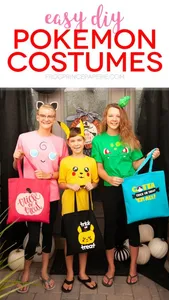
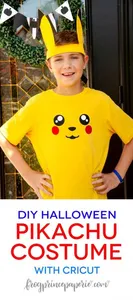
Halloween and birthday parties are way more fun when there is a DIY Pokemon costume or two in attendance. In the last post, I showed you how to make a Pikachu costume and today we’re giving you an easy to make DIY Jigglypuff costume. This is a super quick project with the help of your Cricut Machine!

Costumes that are a t-shirt and headband are quite often the last-minute type, but that’s ok! They work, and they make the kids happy. You could embellish this Jigglypuff costume with a fluffy tutu or pink leggings. Jigglypuff is also known for wearing bows!
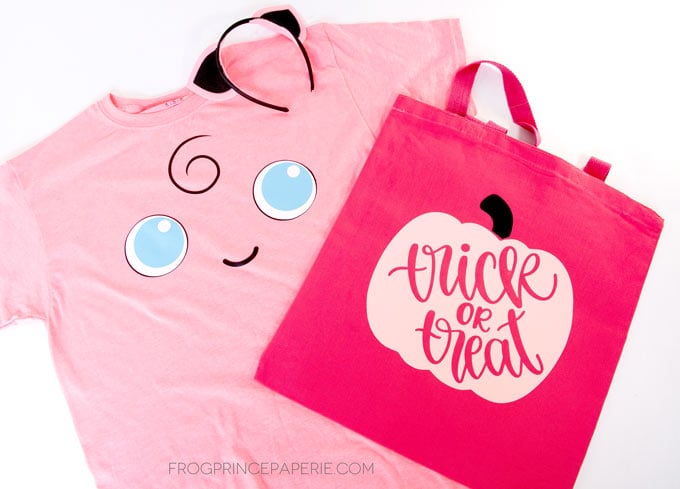
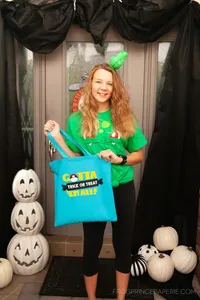
When you are putting together a Pokemon Halloween costume, you can’t forget the trick-or-treat bag. I’ve included this great option for bags that will match more than just a Pokemon character.
How to make a DIY Jigglypuff costume shirt
Open the file, cut, iron on the vinyl, done! You can’t get easier than this!

DIY Jigglypuff Costume from Pokemon
Have a Pokemon lover? This DIY Jigglypuff costume will make their party or Halloween dreams come true. Bonus? With a Cricut Explore Air 2 or Maker machine, it'll take less than 20 minutes to make.
Materials
Tools
- Cricut Cutting Machine
- Standard Grip Cutting Mat
- Cricut Weeding Tool
- EasyPress Mat
- EasyPress 2 heat press
Instructions
Preparing your Pokemon Jigglypuff costume for Cricut Cutting
T-shirts come in all sizes and widths! To make sure your image is going to look right on the shirt you have chosen, be sure to measure the space you want the image to fit in. For this project, I used an adult large shirt, and the graphic is 9.5 inches wide.
Open the Cricut Design Space file. Select all the items on the page and resize to the correct width.
Cutting your Jigglypuff costume pieces
Click "MAKE!" This design is perfectly symmetrical and doesn't have any words, so don't worry about mirroring. Choose the correct Vinyl type, and if you're using the Explore Air 2, adjust your knob accordingly.

Put your iron-on vinyl on the sticky mat shiny side down and put it in your machine. Cut all three pieces of vinyl for the DIY jigglypuff shirt.
PRO TIP: Cricut SportFlex has a super slick back. To make sure that the vinyl does not move while cutting, use a few pieces of washi tape to tack it to the mat.
Weed the vinyl--I find the Cricut weeding tool to be most convenient.

Assemble your Jigglypuff Costume
Warm up your EasyPress 2 to 315 degrees and set the timer for 30 seconds.
You can use towels if you don't have an EasyPress mat, but the mat is one of the best crafty investments you'll make as it will make ironing on vinyl SO much easier to do. Put your t-shirt on the mat (or put it inside the t-shirt.)
Your EasyPress should be heated up. Warm up the t-shirt by pressing it for 15 seconds.
Place the black vinyl piece on the shirt.
PRO TIP: The rule of thumb for centering vinyl on shirts is to place the top of the design three finger widths down from the bottom of the shirt collar.
Press the vinyl for 30 seconds with pressure. LET COOL COMPLETELY if you are using SportFlex vinyl. It's tempting to do it sooner, but that usually leaves you with a wrinkly mess.
Peel up the plastic carrier sheet from the vinyl.
Place the white circles for the eyes within the black circles.
Press the vinyl for 30 seconds with pressure. LET COOL COMPLETELY then peel up the plastic carrier sheet from the vinyl.
Repeat for light blue eye centers.
Recommended Products
As an Amazon Associate and member of other affiliate programs, I earn from qualifying purchases.


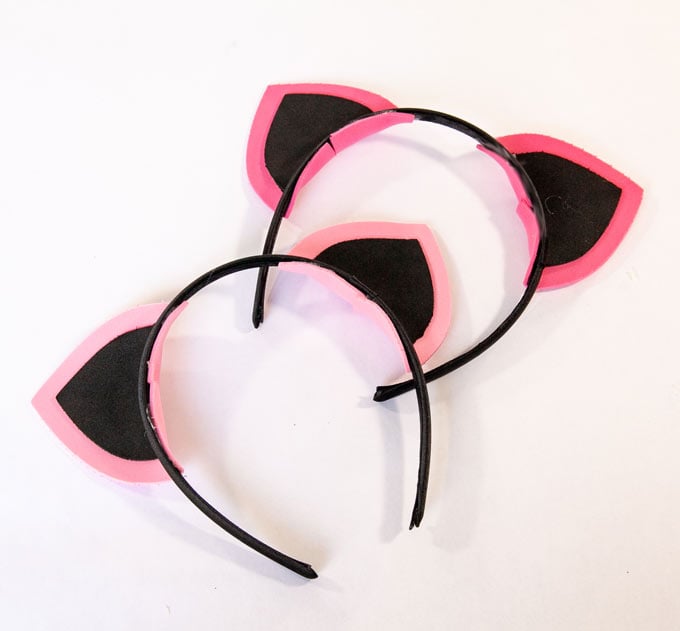
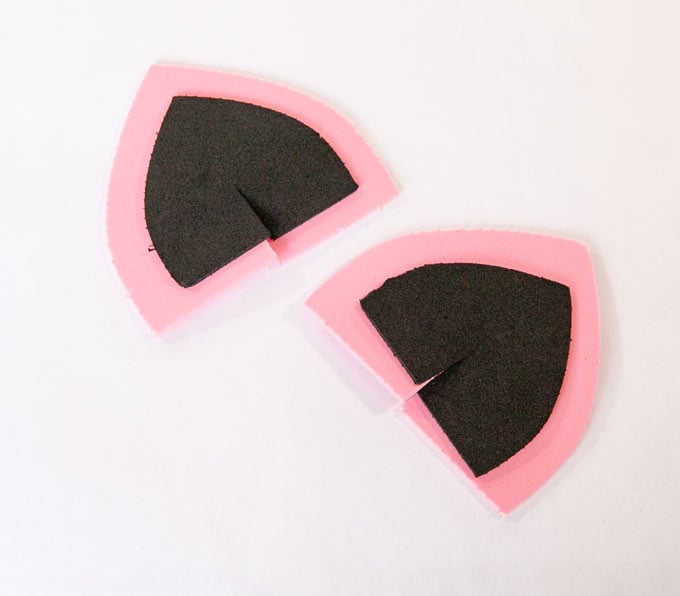
How to make DIY Jigglypuff costume ears
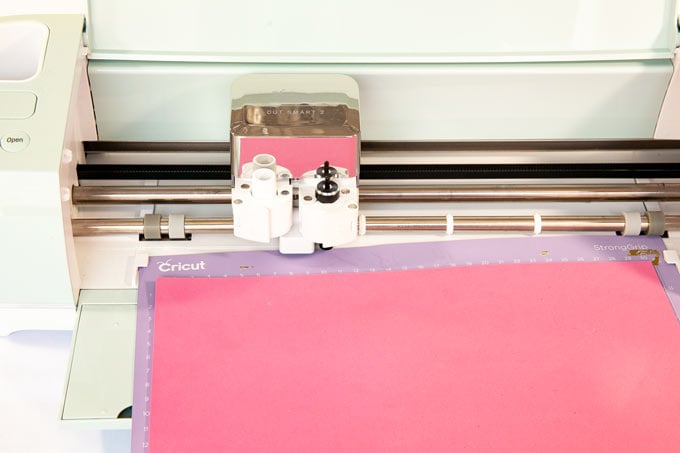
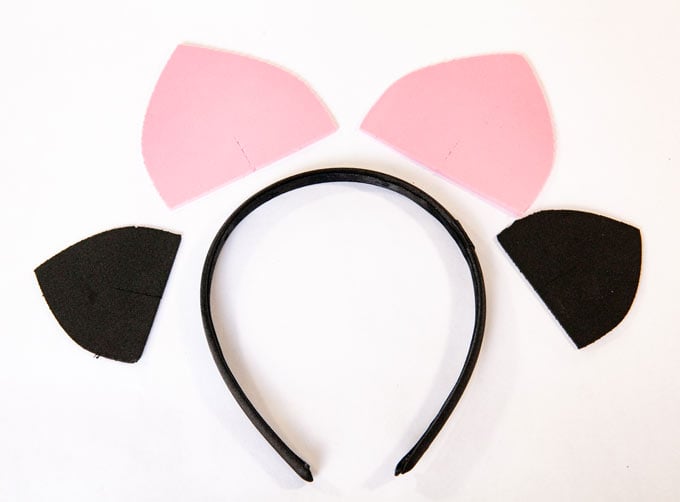
The matching ears on a headband are also pretty easy. You’ll need the Cricut Deep Cut blade to make this one, but it beats the heck out of tracing and cutting the craft foam on your own.
 The free Jigglypuff SVG will need to be uploaded to Cricut Design Space to make, and I give you a step by step on how to do that in this tutorial.
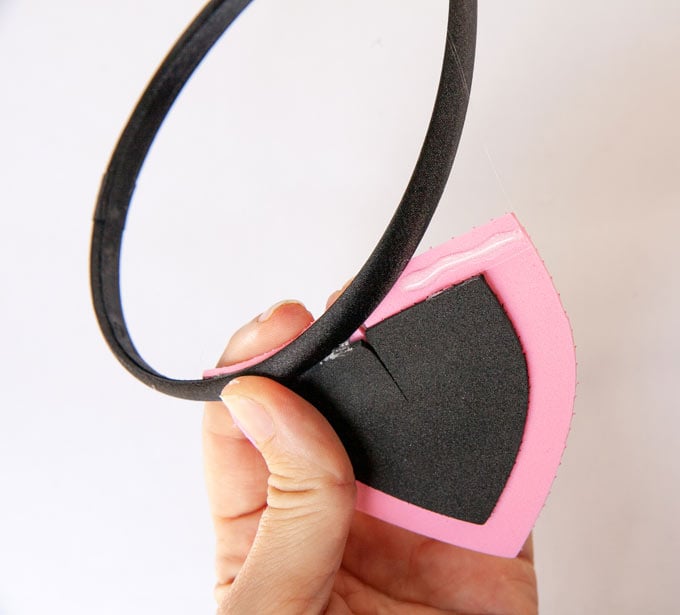
These ears were designed to work with a thin headband. Headbands like this are available in multi-packs from dollar stores or big box stores quite inexpensively. Download the Jigglypuff SVG file. Open up Cricut Design Space on your computer. Choose "New Project" for a blank canvas. Choose the Jigglypuff svg file to upload. Once it's finished processing, and impression of the image should appear in the checkered box on the page. SVG files don't always upload in a readily usable way, so sometimes you have to make a few adjustments before you're ready to cut. Select the two larger triangular shapes. We're going to change the color of these ears so the program knows not to cut all four shapes out of the same color foam. On the top tool bar near the left hand side, there is a box that should currently be colored black. Click on the box to open the color drop down and change the color to pink (or whatever color you want.) Youi're ready to cut now! Click "Make", choose "Craft Foam" as your material, and insert the Deep Cut Blade into your machine. The craft foam will need to be tacked to the sticky mat with a few pieces of washi tape. (Doing this proactively lets you avoid ruining a sheet of material when it slips off the mat.) There will only be two sheets to cut for four shapes total. With a little hot glue, adhere the black triangle over top of the pink. Leave a border on the bottom that is equal to the width of your headband. This part will be folded under and glued. Run a bead of glue along the bottom of one half ONLY of one of the ears. These need to be glued on a little at a time to avoid making a mess. Place the hot glued ear underneath the headband and hold in place until set. Run a bead of hot glue along the other side of the ear and press underneath the headband, holding it in place until it is set. You'll need to bend the ear once the glue dries so the ears become concave and the tips point forward instead of backwards. The craft foam is pretty forgiving, so this is easy peasy. Repeat the above for the second ear. As an Amazon Associate and member of other affiliate programs, I earn from qualifying purchases.
DIY Jigglypuff Costume Ears
Materials
Tools
Instructions
How to Upload an SVG file - the Jigglypuff SVG
 In the left hand column, choose "Upload." This will bring you to a new screen.
 Click "save", then on the next page choose the ear image to insert into your canvas.
 Altering the SVG for cutting
 For the Jigglypuff SVG, once the image is in your Design Space canvas, select the images and click "Ungroup" at the top of the righthand column.

Cut the Jigglypuff Ears
Assembing your DIY Jigglypuff Ears


Recommended Products

How to Make a Pumpkin Trick-or-Treat Bag
This is another super simple iron-on project. I managed to get these nice canvas bags in a rainbow of colors from Amazon, and for the price, they’re nice to have on hand for anything like a Pokemon trick-or-treat bag that needs to be quickly made.
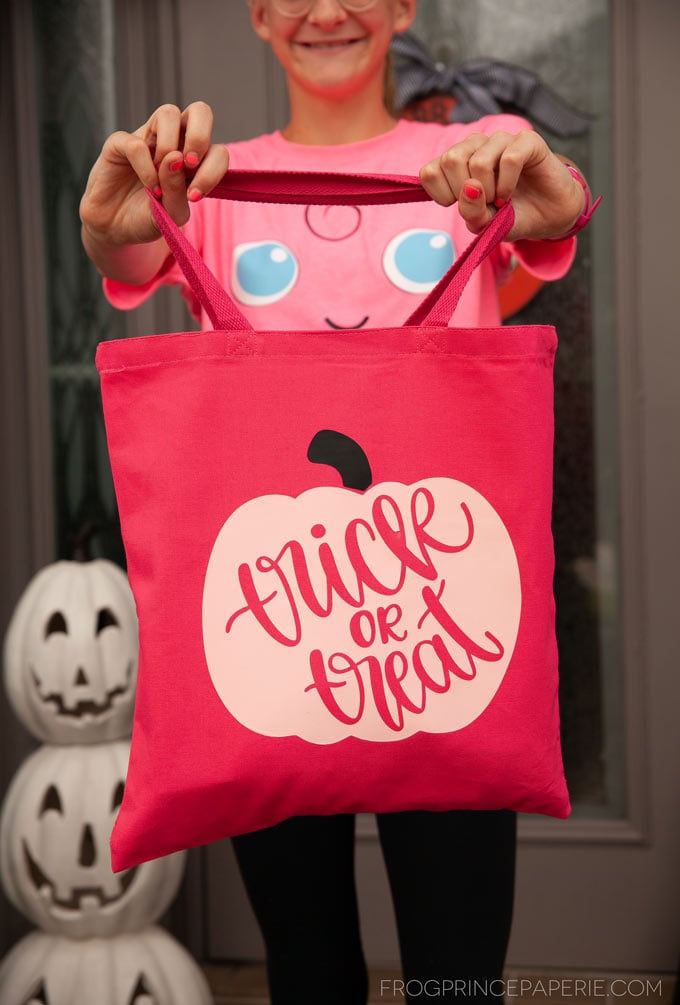
Materials:
- Canvas bag
- Choice of color of vinyl
- Trick or Treat pumpkin project file on Cricut Design Space
Use the same iron-on method as above to make. You don’t need me to tell you all that again!

More Pokemon Costumes!
There are more than 800 different Pokemon in the Pokemon universe…so if Jigglypuff isn’t your kid’s favorite, there are others to choose from! See Pikachu here and a DIY Bulbasaur costume tutorial here–be sure to come back for the project files!
Related Ideas

Laura
Monday 17th of October 2022
Hello! Thank you so much for sharing your ideas and your work! I love your design and my daughter wants me to make her this JigglyPuff shirt for her for Halloween! When I clicked on the link for the "Jigglypuff Design Space file" it didn't work. It just took me to the Cricut Design Space Window. Maybe I am doing something wrong. If you could tell me what I'm doing wrong or possibly email me the svg file I would be SO grateful! Thank you again! :)
Paula Biggs
Thursday 20th of October 2022
It's a Cricut thing, unfortunately. I don't know when they change the links until you guys tell me, so thanks! Here it is: https://design.cricut.com/landing/project-detail/5d7a731c8e2f1a05e4e0197c