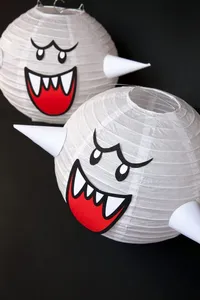
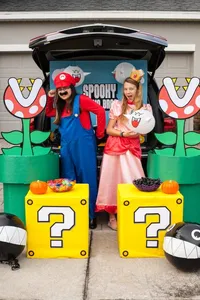
From the day I put up our Super Mario Trunk or Treat post, I started getting questions about the Piranha Plant DIY and where the heck the graphics were to make the Question Mark Box. Going to be totally honest here, on the difficulty scale, this plant project is about a 6 or a 7, but you can do it!

Mario Brothers Piranha Plant DIY
As I mentioned, this project is a little tough, but it’s mostly because the materials are so big and hard to manage. It’s do-able, but you’ll likely need a second person to help out a bit.
Materials:
- Large sheet black foam core
- 18×18 in carboard box (or similar–recycle and save one from Amazon!)
- Small hula hoop – dollar store good place to find
- Piranha plant file (download here)
- Pipe insulation
- Green craft paper (buy it here)
- 4 foot rod
- PVC pipe in cement
- Packing tape

You’ll need to bring the Piranha plant poster to a print center that has a wide format color printer. Grab a coupon before you go! The print will be somewhere in the range of 24″ wide to 48″ long. After you print it out, you’ll need to mount the picture to a piece of black foam core and cut it out with a hot knife. I’ve got a tutorial on how to do that here. Different project, same idea! Watch the video.

After you’ve got your plant cut out, tape your rod to the back. I have a 5 gallon bucket I’ve anchored a 1.5 inch piece of PVC pipe into that I use for ALL kinds of projects (Boat sails, projector screens, balloon arches, etc. etc.) The bucket goes in the green sewer pipe we’re about to make and the the rod goes in the PVC pipe. The bucket will keep your plant from blowing away and keep the graphics upright.

A hula hoop?? What the heck?? Really, it makes great bones for a pipe. The Dollar Tree sells smaller size hula-hoops that are perfect in this setup.
Make the pipe: You’re going to slit your 18x18x18in box open so that all four sides lay flat on the ground. One good vertical cut will do it! Cut the flaps off the top, but save them because they’ll make the lip of the pipe.
We “pre-rolled” the cardboard before we tried to shape it around the hula hoop, which made it easier to work with and easier to convince to be round. With a little bit of help from a friend, wrap the cardboard around the hula hoop and tape the hula hoop to the cardboard with good packing tape.
Use your green craft paper to cover the cardboard.
Make the lip of the pipe: Tape your leftover flaps from your box into one long piece. Cover this uber long cardboard rectangle in paper.

To get a bit of a bump out on the lip, we put a piece of piping insulation (buy at Lowe’s, etc.) at the top of our big green tube and hot glued it down. That part will take some patience. 
After the insulation is good and stuck, glue the rectangle to the insulation. You might need a hand to get this part done!

From there, put the cement bucket with PVC pipe in the green “pipe” and put the Piranha plant graphic on a stick into the PVC. And you’re done!
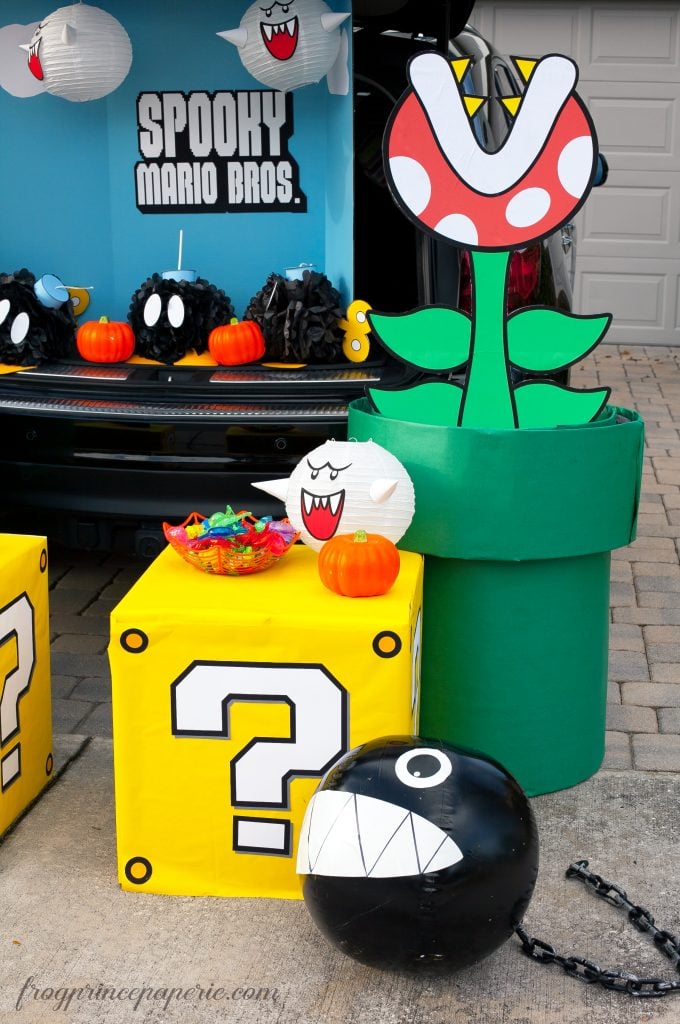
How to make a mario brothers question mark box
This is pretty basic! The print out is sized for a 13×19 paper. Yellow craft paper is the quickest and cleanest way to get the solid yellow look–paint isn’t going to work so great here.
Materials:
- 18x18x18in cardboard box
- Yellow craft paper (buy it here)
- 13×19 white paper
- Question mark graphics (download here)
Print out and cut out the question mark four times. (Or three, no one will see the back of the box when it’s facing the car.) Wrap your cardboard box in yellow craft paper. Use a glue stick to paste the question mark and four rivets to each side of the box. And you’re done!

But wait! There’s more! You can see more ideas to make your own Mario party here:

Related Ideas


Paula Biggs
Owner at Frog Prince Paperie
- Valentines Day Ideas
- Baby Yoda Valentines Ideas with Cricut
- 15 First Day of School Free Printable Signs
- Older Kid Easter Egg Hunt Ideas at Home
- Mario Brothers – How to make a Bob-omb DIY
- Mad Science Lab Trunk-or-Treat Ideas
- About to Pop Free Printable Baby Shower Invitation
- {Free Printables} Breast Cancer Awareness Month
Kate
Friday 19th of September 2025
Hey!! You're AMAZING at this! I was wondering in looking at your pictures, what did you make the chain out of for your chain chomp? lol!!
Paula Biggs
Tuesday 30th of June 2026
Definitely a dollar tree find!
Stephanie
Thursday 3rd of October 2024
Can I spray paint the cardboard box instead of wrapping it in craft paper?
Thanks!
Paula Biggs
Tuesday 30th of June 2026
I suppose you could? However, it might take a few coats!
Emily
Friday 20th of October 2023
Where did you get the font lettering for the "Spooky Mario Bros" sign?
Paula
Monday 23rd of October 2023
@Emily, I probably used “Super Plumber Brothers” font (a hard drive crash wiped my file with this font along with it!), but if you Google “Super Mario Fonts” you’ll get lots of options of similar ones to use!! FontSpace and DaFont are pretty reputable to download from.
Paul
Saturday 7th of October 2023
Finding it impossible to figure out how to get 13x19 color printouts anywhere. Does anyone have any suggestions for easier to find/create options?
Paul Dixon
Monday 23rd of October 2023
@Paula, Thank you!
Paula
Sunday 8th of October 2023
@Paul, I have a printer at home that prints 13x19 -- if you don't have access to a larger format printer at home, I'd ask your local print shop who has a wide format printer (the 24" kind) if they will print by the inch (I assume for the question marks). The Pirhana plant is a non-standard size because of it's dimensions, and that's how I've always gotten him printed. Alternatively, you can have your printer print to scale and have smaller boxes if you don't want to go that route.
Leeza
Saturday 30th of September 2023
Hi! I’m currently following these instructions for my trunk or treat! How did you get the chain chomp face on the ball? If it was cricut where did you get the svg from?
Paula
Sunday 8th of October 2023
@Leeza, this was done pre-Cricut days for me, so I printed that out and cut by hand! I'm sure a Cricut would make easier work of it. I believe the font is "Super Plumber Brothers" but a google search for super mario bros fonts has some good choices.
Leeza
Sunday 1st of October 2023
@Paula, Omgosh thanks so much for replying that helps me a lot !!! For the SPOOKY MARIO BROS on the board did you do that on cricut Aswell? If so what font did you use and offset ?
Paula
Sunday 1st of October 2023
@Leeza, if I recall correctly, that part was tricky. I believe I ended up using a good size piece of black duct tape to connect the chain to the ball. At that point in time, there were no solid black beach balls to purchase (amazon sells them now) so I had to spray paint and nothing wanted to stick to the spray paint that was nice looking. I just kept that part towards the ground so it wasn't so visible.
For the Faces--I truly just freehanded these. The size of the mouth will depend on the size of your ball. You'll just need to cut an oval with pointy ends out of vinyl; I recommend measuring and using a piece of paper first to make sure you have the right size. A thick tipped sharpie was used to draw in the teeth. Then, I used a few vinyl circles for the eyes. Easy, peasy, promise! I don't think I even owned a Cricut when I built this party, haha!