
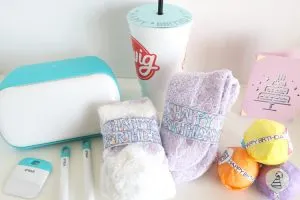
The tiny little cutting dynamo, the Cricut Joy, is going to be one of your crafting BFFs. I am so in love with this little machine, and so are my kids! If you’re short on space and short on time, this is a tool to have in your arsenal.
The Cricut Joy is pretty small compared to its big brothers. It would fit on a dinner plate, and the accessories and mats are equally small and easily stashed for those of you in small living quarters. Heck, you don’t even need mats if you’re using the Cricut Joy vinyl! If you need a quick label or a card or a need to cut a smaller piece of vinyl, you can make your project in less than 15 minutes without dragging out big machines and big mats and your computer. You can create on your countertop with your phone!
This is a sponsored post written by me on behalf of Cricut. All opinions are 100% mine.

While this may not seem exciting at first, it will make crafting all the little projects in the house you want to get to SUPER simple to do. I’d love to label everything in my kitchen. But the truth is, I’m way too lazy to do all the running up and down the stairs and to drag my mats and machine and materials to do the work. Making labels with the Cricut Joy, though? Easy breezy.
But seeing is better than reading. Here are a few little projects you can make with your Cricut Joy in 15 minutes or less, including labels!

Part of what makes the Cricut Joy so brilliant is that there are some special materials that are made just for it that don't require a mat--and therefore you can make projects that are super long. I hear up to 30 feet or so on a single cutting! Vinyl is one of the materials specially made for the Cricut Joy you can feed right into the machine on a roll. The tiny machine is super portable, which makes it easy to set up anywhere and run by bluetooth. Even off a phone! So set it on the kitchen, and start labeling all the things! In this project, I labeled a few jars to hold pens and weeding tools. (These are upcycled yogurt containers!) You can label just about anything with the Cricut Joy vinyl. Open up Design Space, type in your words, then adjust the size of your word for your desired font and size. Hit "make." Select the material type, then feed the vinyl into the Cricut Joy. If one end of the vinyl roll doesn't work, try the other. Sometimes you might just need ot change the angle you are feeding the material in to get the machine to grab it! At this point, the on screen prompt will take you along the rest of the process. Cut off the piece of vinyl you're using, then weed your words out. Apply the label to your container using a bit of transfer tape. 

Make Vinyl Labels with the Cricut Joy
Materials
Tools
Instructions


These Cricut Joy cards are so fun and easy! The Cricut Joy Card Insert pack makes it so you choose a pre-cut and pre-folded card blank then cut with the Cricut Joy, and it's practically ready to send in 5 minutes or so. There are TONS of free cards available for the Joy in Design Space! Load up your Cricut Joy card mat with one of the cards from your Cricut Joy Card Insert pack. Slide the back half behind the clear plastic and fold it over to stick the front to the sticky mat. Be sure to line it up along the top of the mat when you stick it down! Follow the prompts on the screen to choose your material, then push the loaded mat into the Cricut Joy. The machine will automatically grab and read your mat. There will be a prompt to begin cutting (or drawing). Follow the directions on screen! Since there are no buttons to push on the Joy, you have to follow. what the computer says to do. Unload the mat and choose a contrasting color for your card with one of the unfolded pieces of paper in the card insert pack. The card design should make a place to put each of the four corners of your paper to make it stick to your card without any adhesives. And you're done! Sign your greeting, put it in one of the.included envelopes and wonder at how quick you were able to make a card with the Cricut Joy. 

Make Cards with the Cricut Joy
Materials
Tools
Instructions
 Browse through the card. files in Cricut Design Space until you find the perfect one for your recipient. Open it up, and click "Make."


We're spreading a little joy around our neighborhood this week with chalk. I bought a gigantic pack of chalk on Amazon, but from there, I truly used what I had at the house to make these small favors. (Which says a lot about what I might have laying about!) Open up the file for the labels in Design Space. You can change the wording to whatever you like in whatever font you like. This one is really just a guideline! The circles in the file are set up for around three inches; change this to whatever width fits your bags. You can fit two 2-inch circles side by side on a strip of Cricut Joy writable vinyl if you choose to change the size. After you have things set up the way you want on your Cricut Joy, making the rest of the sidewalk chalk party favors is a breeze. Hit "make" Follow the on-screen prompts to cut out the labels. You'll have to push the Cricut Joy writable vinyl into the machine until it grabs it before it will start writing and cutting. You don't have worry about not having enough material, because the Joy will measure your vinyl before it starts cutting so it will have enough to work with. The Joy will first write on the circle and wording, then cut. Be ready to change out the pen for the blade. After it's done writing and cutting, all you'll have to do is peel the labels off to use them, no transfer tape needed! If you've got a regular sized cricut, you can probably cut these out on your machine, but if not, french fry boxes are pretty easily found at your hobby craft store or online. Add the labels to near the bottoms of the cellophane bags. Load up the boxes with sticks of chalk -- just like french fries -- and then drop the whole thing into a cellophane bag. The bag is so the chalk doesn't go everywhere. Twist the cellophane near the box then tie it off with a length of ribbon. And your sidewalk chalk party favors are done and ready for gifting! 

Sidewalk Chalk Party Favors
Materials
Tools
Instructions


Making Sidewalk Chalk Favors
Related Ideas


Paula Biggs
Owner at Frog Prince Paperie
- Valentines Day Ideas
- Boo Cup Halloween Boo Your Neighbors
- DIY Friendsgiving Ideas
- Spartan Warrior DIY Halloween Costume
- How to make a DIY Tissue Paper Parrot for Luau Parties
- Princess Bride T-Shirt free SVGs
- Cup full of cheer custom coffee mug for Christmas
- 10 Things You Didn’t know the Cricut Maker Could Do for Home Decor