
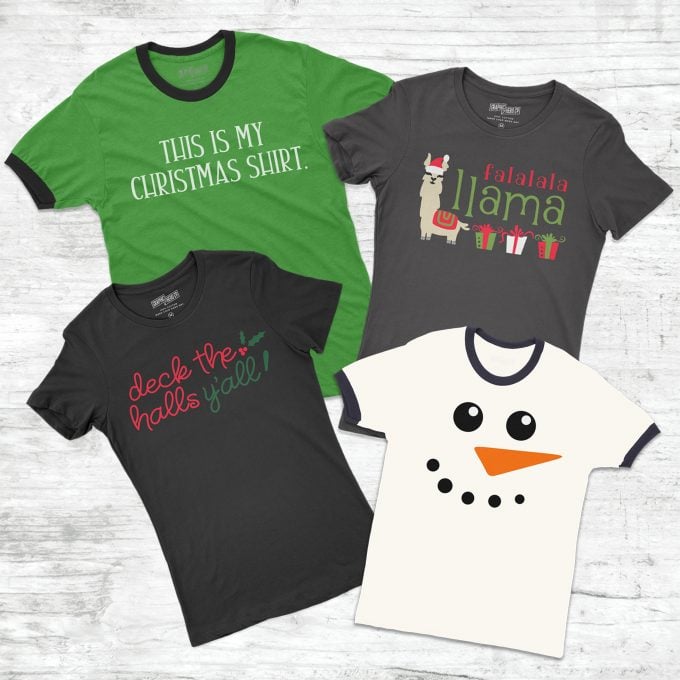
There is nothing like a good Christmas shirt to celebrate the season. Snarky or sweet, as long as it gets you in the holiday spirit, it’s a good thing. Recently, I put a whole bunch of great Christmas t-shirt designs into Cricut’s Design Space for you to use and here they are!
For each shirt, I’ve listed the supplies you’ll need, but for all of them, gather up:
- Cricut Machine (buy it here)
- StandardGrip Machine Mat (buy it here)
- Cricut EasyPress™ 2 (buy it here), or Household Iron and Press Cloth
- Cricut EasyPress™ Mat (buy it here)
- Weeder (buy it here)
- T-Shirt

This is my Christmas Shirt T-Shirt
For any bah humbugs in your life, a “This is my Christmas shirt” t-shirt is the perfect addition to their holiday wardrobe. Simple, yet stunning!
Materials:
- SportFlex Iron-On, white (buy it here)
- Cricut Project File (click here)
Cut the images out of vinyl and weed. Don’t forget to mirror before you cut! Center the lettering on the t-shirt and use your Cricut EasyPress to iron onto the shirt using the recommended settings. Wait for the vinyl to cool, then peel the carrier sheet.

Deck the halls y’all Christmas t-shirt
The perfect Christmas shirt to deck the halls in! The project is ready to cut–just hit “make it!” I made this for my Christmas Gingerbread Party this year, and it was a HUGE hit!
Materials:
- Cricut Glitter Iron-on, Red (buy it here)
- Cricut Glitter Iron-on, Kelley (buy it here)
- Cricut Project File (click here)
Cut the images out of the glitter vinyl and weed. Don’t forget to mirror all the images! Center the red “deck the halls” on the shirt and use your Cricut EasyPress to iron onto the shirt using the recommended settings. Wait for the vinyl to cool, then peel the carrier sheet.
Position the “y’all” and holly leaves onto the t-shirt, and replace the carrier sheet over the already pressed vinyl. Press the new vinyl according to recommended settings. Wait for the vinyl to cool, then peel the carrier sheet then wear the shirt and get out and deck some halls!

Falalala Llama Christmas t-shirt
Get in on the llama craze with this fa la la la llama Christmas shirt!
Materials:
- Cricut Everyday Iron-On™ Sampler, Jolly (buy it here)
- Cricut Everyday Iron-On Sampler, Elegance (buy it here)
- Cricut Project File (click here)
Cut the images out of vinyl and weed. Don’t forget to mirror all the images before cutting! Center the red pieces on the shirt and use your Cricut EasyPress to iron onto the shirt using the recommended settings. Wait for the vinyl to cool, then peel the carrier sheet.
Position the green pieces onto the t-shirt, and replace the carrier sheet over the already pressed vinyl. Press the new vinyl according to recommended settings. Wait for the vinyl to cool, then peel the carrier sheet. Repeat for tan, black and white vinyls.

Snowman Christmas T-shirt
A frosty Snowman Christmas shirt for walking in a winter wonderland.
Materials:
- Cricut Glitter Iron-on, Fluorescent Orange (buy it here)
- Cricut Everyday Iron-on, Black (buy it here)
- Cricut Everyday Iron-on, White (buy it here)
- Cricut Design Space file (get it here)
Cut the images out of vinyl and weed. Don’t forget to mirror all the images before cutting! Center the black pieces on the shirt and use your Cricut EasyPress to iron onto the shirt using the recommended settings. Wait for the vinyl to cool, then peel the carrier sheet.
Position the orange nose piece onto the t-shirt, and replace the carrier sheet over the already pressed vinyl. Press the new vinyl according to recommended settings. Wait for the vinyl to cool, then peel the carrier sheet. Repeat white vinyl.
Want more Christmas t-shirt ideas?
I’ve made bunches of t-shirts for y’all this year! See the others:
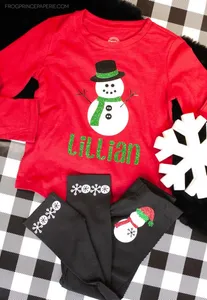
Snowman with custom name (and pants!)
This is a sponsored conversation written by me on behalf of Cricut. The opinions and text are all mine.
Related Ideas


Paula Biggs
Owner at Frog Prince Paperie
- Tips for Successful Holiday Entertaining
- Top Things to Do in Your Christmas Jammies
- DIY Halloween Mask Ideas for Cricut
- Personalized Christmas Pajamas with Cricut Explore Air 2
- Custom Christmas Shirts for Toddlers and Infants
- How to Put Cricut Vinyl on Wood with Your EasyPress 2
- Let’s Get Lit Holiday T-Shirt Designs
- Christmas Pickle Ornament Free Printable
20 Handmade DIY Christmas Shirts for Adults | The Crafty Blog Stalker
Wednesday 6th of November 2019
[…] 14. This is my Christmas Shirt […]
CP
Monday 31st of December 2018
Oh my word! These are fantastic!
Paula Biggs
Wednesday 9th of January 2019
Thank you, CP!!