
How to Decorate a Paper Mache Easter Egg
Now that you have gone through the patience-testing process of letting the paper mache Easter eggs DRY, you’re going to want to decorate them up! Things you can use for this:
- Colored/patterned paper
- Tissue paper
- Sequins
- Glitter
- Ribbon
- Things they pick up off the floor
- Random shiny things
Really, a child’s imagination when presented with glue, paper and shiny stuff is limitless. (You may just have to have them explain their artistic process later.)

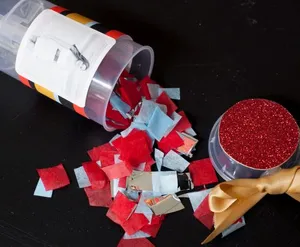
All that said, if you want CONFETTI EGGS like I showed you in those pictures, you’re going to want to use paper and a hole puncher. The one inch circle is about in line with the scale of the water balloon eggs. Find a few pieces of scrapbook paper that coordinate and start punching. I’d recommend the lighter weight/thin stuff and the thicker paper did not want to wrap around the eggs.
Remember that extra Elmer’s glue and water mix you saved in the Tupperware? Time to get it back out.

Dip the blank side of the circle into the glue, then slap it on to the egg. With finesse, of course. We’re going for cute and cultured. If you’re an adult and making these, start at the top and glue the circles on in rings. You can change color each ring you make, or create a pattern, or something equally adult looking. If you’re a kid, you’ve got paper, glue and a surface to adhere to, you’ll figure something out you love and it’s all about the chance to be wildly creative anyway.

My two didn’t do half bad. They used a mix of tissue paper and paper to decorate their eggs, and they turned up pretty neat looking. Even the one that the 10 year old made with just plain colored paper turned out nice!
As a side note, if you don’t have any paper mache paste left over, just whip out your glue stick, or another bottle of Elmer’s glue and use it to paste stuff on.

You will have to sit your eggs aside for a bit while they dry again. After they are dry, pile them up in a pretty bowl to display! Since they’re made of paper, they’ll even be good for next year. Hope your family gets to have a bit of fun with this one–and don’t forget to pin this post for later!
Thank you to Elmer’s Products for sponsoring this post. You probably already know how awesome their stuff is, and so do I, but still have to let you know all thoughts, opinions and ideas here are my own.
Related Ideas


Paula Biggs
Owner at Frog Prince Paperie
- Valentines Day Ideas
- Tips for Successful Holiday Entertaining
- Large Format Project with Cricut Maker 3
- Easy Valentine Craft – Paper Heart Garland with Cricut
- Let’s Get Lit Holiday T-Shirt Designs
- Pokemon Painted Rocks – Summer Kid Craft Project
- Easy DIY Star Wars Costumes
- St. Patrick’s Day Easy Home Decor
Chloe/Its Written on the Wall
Monday 7th of March 2016
Such a cute craft for kids and what a darling little boy!